Week 9: Relevé All Day
Katie b -
This week has been a lot of testing, and frankly my feet are getting very tired! 😕 I was able to get a lot done though, so this post is a long one!
If you remember from last week’s post, I wanted to adjust the angle of the pre-arched shank after briefly testing one of the shanks I 3D-printed. The shoe felt that it was breaking too low on my foot and making me sink into the shoe, which after hours of dancing will cause pain in the toes. I took my design back into SOLIDWORKS to try to solve this issue. This is what I came up with:
I changed the design to where it remains completely vertical for slightly longer. Originally, the arch started 85mm from the bottom, and now it starts at 110mm. I was able to make this adjustment fairly quickly, so I immediately sent it over to get printed. The guy at Gore was once again very nice, and he managed to get it back to me the next day! Below is a visual comparison of the difference between my two designs. The orange is the original and the blue is the new.

For the next part of this blog post, it will be important to know some simple ballet terminology. If you know French, you might be able to figure some of these out, but I will define them for you anyways!
Plié: a bending of the knee or knees.
Rise: raising the body onto pointe without a pilé to start (knees straight the entire time)
Relevé: raising the body onto pointe by starting in plié and using a springing action
Posé/Piqué: stepping directing onto pointe of the working foot with the other foot raised in the air
Arabesque: position of the body supported on one leg with the other extended behind
Pirouette: a complete turn of the body on one foot
Now that you have some basic ballet knowledge, this is the routine I came up with to test each of the 6 shanks. One foot was placed in one of my current shoes (almost dead) and the other in the shoe to be tested. First, I would do 3 simple rises on two feet to ensure my confidence in the shoe and test the flexibility of the shank. Next, I completed 10 single-leg relevés in a row to test the stamina of the shank. Then, I tried 3 posés en arabesque to test the stability and balance of the shank. Lastly, I did 3 pirouettes to see how the shank performed when placed under torque. Now, I needed to swap the shoes between my left and right foot to repeat the process before trying a different shank. As you can imagine, doing this routine 12 times back-to-back started getting very tiring, and so fatigue must be taken into account when examining how well my feet were able to perform in each shank scenario. My analysis of each shank is listed below in the order that I tested.
Original design PLA shank: While it did technically hold me up, it felt extremely stiff, hard, and brittle. When doing rises with this shank, my foot was not able to smoothly roll from flat through demi-pointe all the way to pointe because it is so strong; it felt like I was not in control of my own foot.
Original design PETG shanks: The PETG is much more flexible than PLA which in turn made the shoe more comfortable and easier to control; I didn’t feel overpowered. After trying out all 4 different print directions, I did not notice any significant differences in how they performed. The shank with vertical print lines felt maybe ever so slightly stronger, but not by much.
New design PETG shank: I was super excited to try my new pre-arch design, but ultimately it didn’t do what I had hoped it would. I had made this adjusted design to try to prevent the shoe from breaking too low. Standing en pointe with this shank was very beautiful, comfortable, and flexible while also being supportive, but it also was hard and uncomfortable to balance while standing flat in the shoes. Because the new design had a shorter, more dramatic arch, it caused my foot to form an arch even when I didn’t want one.
After my new design did not meet the expectations I was hoping for, I was on the hunt for another possible solution. I decided to start making more comparisons to a brand new shoe in which it did not appear to be breaking too low. A basic difference between a brand new shoe and a dying shoe is the strength of the toe box. When a box is strong enough, it will hold your toes and not let your foot sink down into the shoe. But in a dead shoe with a soft box (the shoe I have been swapping the shanks in), there is not enough support for your toes which causes your whole foot to sink.
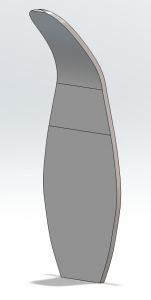
To test whether this affects the arch breaking too low, I have decided to add a toe box into my 3D design! Just when I thought it was time to retire from my SOLIDWORKS career, I needed to freshen up my skills for one more project. After about 5 hours of measuring and designing, I finally finished it!
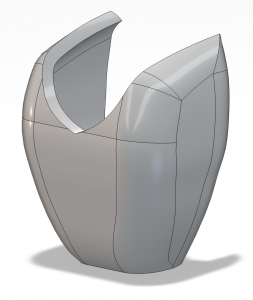

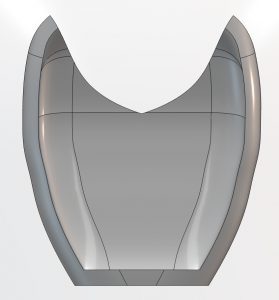


I am excited to get this printed over the weekend so that I can test it out and hopefully add it to my final product. In the meantime, I will be continuing to work on my final presentation slides in preparation for my meeting with the senior project committee next week!
Comments:
All viewpoints are welcome but profane, threatening, disrespectful, or harassing comments will not be tolerated and are subject to moderation up to, and including, full deletion.