Week 9- Women in STEM Learn to Cut Sponges
Hi friends!
I hope you’ve been having a wonderful week! I was able to visit the University of Arizona for my site placement yesterday, so I have some fun (and picture filled) updates 🙂
Let me tell you a little more about how my day went:
I arrived at the University of Arizona’s Civil Engineering building at around 9 am and was met by Dr. Jack Welchert. We then headed straight to the lab so I could begin working on some things for the rapid small-scale column test. Let me tell you more about what that is.
So this is a Rapid Small-Scale Column Test:

This is a test the PFAS sponge group is using to test the limits of the sponge. What it does is it uses a peristaltic (a type of movement that is akin to peristalsis in our body) pump to push PFAS-contaminated water through the sponge. The water that comes out of the sponge should be contaminant-free, meaning the water will be PFAS-free. However, at a point known as the “breakthrough point”, the sponge will be completely saturated with PFAS and will be unable to decontaminate the water. The goal of the test is to understand how saturated the sponge can get before it needs to be replaced.
So what exactly was the purpose of my visit? I was there to help prep the column for the PFAS sponge testing, which I will tell you more about:
The first thing I did, obviously, was practice lab safety by wearing a lab coat, gloves, and goggles. But the first step of my work was to prepare the sponge for the column testing by reducing its particle size. How is this done?
Well, the sponge was given to me in a big block, so I had to cut it into smaller pieces first.

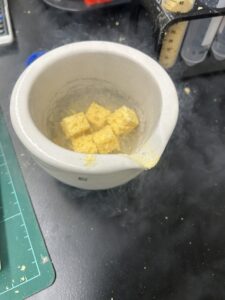
Then comes the fun part: I put the smaller sponge pieces in a mortar and pestle and used liquid nitrogen to make the sponge brittle/fragile, so it would be easier to crush up into smaller pieces (I had to take a few breaks while doing this, as the liquid nitrogen makes the mortar and pestle so cold that it can cause ice burns).
After I crushed up all the remaining sponge pieces, I made a mixture with the “sponge dust” and ethanol. This removes any impurities that may exist in the sponge. The mixture was then mixed for around an hour by a stir bar (a small magnet that is placed in a liquid which is rotated by rotating magnets beneath the beaker/container).

Once the solution was mixed for around an hour, we ran it through a series of meshes to extract the liquid. After this, it would usually be placed in a vacuum oven to dry. The drying process takes around a day.
I then moved on to the next step of my work, which was to prepare the actual columns.
First, I cut peristaltic pump tubing into 5cm pieces. Then I put a small layer of glass wool (an insulation material made of glass fibers) at the ends of each tube. The glass wool is used to prevent the sorbent (the dried sponge particles after going through the vacuum oven) from escaping the tubing. I filled it majorly with sorbent and then placed a layer of glass wool at the other end of the tube. This is what the tube looked like:

After that, I placed the couplings to the ends of the tube, making them ready for the column.

Throughout my time in the lab, I was accompanied by Dr. Jack, and I learned so many things from him. I always have such a wonderful time in the lab, and I hope to schedule another visit soon!
This was a long post, so thanks for sticking around! That’s all for now, but I’ll be back soon with more updates!
Comments:
All viewpoints are welcome but profane, threatening, disrespectful, or harassing comments will not be tolerated and are subject to moderation up to, and including, full deletion.