Jupiter’s Patterns on My Redwood Chessboard

Cason t -

Hello everyone, and welcome back to this week’s blog post!

Over the past week, I worked on making more chess pieces as well as finishing the board. To start the week, I went to my site placement to work on the pieces. I had already made one rook, but its body wasn’t uniform because I didn’t have a method to make the pieces look similar. My mentor then showed me a way to standardize the bodies: I could roll out the clay and cut out multiple bodies at a time. This method ensures the pieces look mostly the same. Using this approach, I cut out the body of my first rook to reuse the top and bottom. Then I was able to finish making the four rooks needed for the final set.

Rooks and queen

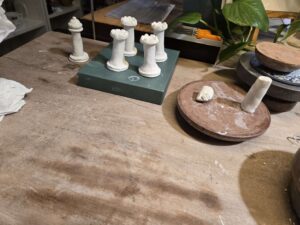
For the queen, the process was quite similar, except that it is slightly taller and has a different top. For the top, I took a ball of clay, placed it on a flattened ball of clay, and folded it up. I used a smoothing tool to make the top look somewhat like a crown, then added a smaller ball on top to finish it. After completing the first queen, I tried to replicate it, but I couldn’t quite remake the top. Since I had to leave soon, I repurposed the piece into a king. To do this, I added a few layers to the top and placed a cross at the very top.

Queen

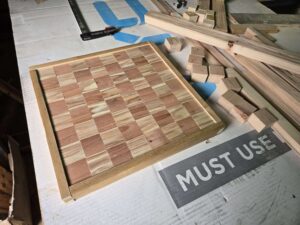
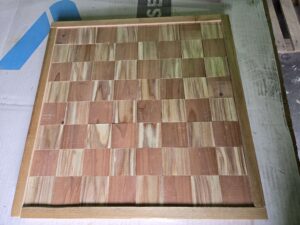
Later in the week, I revisited the board and began working on the final parts of it: the board itself. Originally, I had planned to use cheaper wood, but my father suggested using more expensive, nicer-looking wood instead. The woods we found were beautiful, but none of them were thick enough to match the height of the board. Then, just as I was about to settle for the cheaper wood, we found some redwood. It was more expensive but looked significantly better. We spent some time searching through the wood pile to find two good 8-foot 2x4s, and eventually, we did. Most pieces were either entirely red or just white, but we found a few that were special—they were light on one side and dark on the other, with the light side featuring some amazing patterns. On the board, each block even resembles Jupiter a bit, which I loved.

Redwood

Redwood Blocks

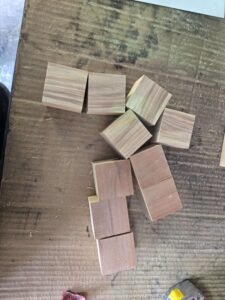
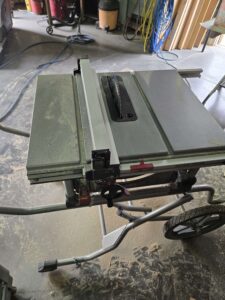
Turning the 2x4s into 2×2-inch blocks required ripping the wood so the width would be reduced to 2 inches. On some test runs with different wood, the blocks always turned out slightly too big. The interior of the frame measured about 16 ⅛ inches, which made cutting the blocks a bit tricky. We had to cut the wood to precisely 2.015 inches using a table saw. To achieve this size, we used a digital caliper for exact measurements down to the thousandth. Thankfully, most blocks ended up really close, with some being right on the 2.015-inch mark. However, there were still slight variations in size, and when placed into the frame, these differences caused the frame to come apart slightly. So, I went back to sanding all 64 blocks. This time, I used a disk sander, which made smoothing and slightly reducing the sides of the blocks much easier.

Table saw

Sanding

Board

Now, with everything coming together, I’m really happy with how the board looks. All that’s left is to glue the blocks together and add a sealant or finish to the board. I’m excited to see the final result! See you all next week!

One of each completed piece:
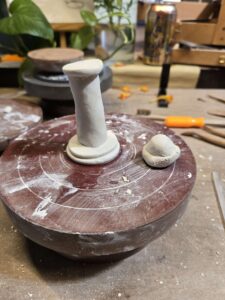
Pieces

Board progression:

Start board

half half

Checkered

More Posts

Comments:

All viewpoints are welcome but profane, threatening, disrespectful, or harassing comments will not be tolerated and are subject to moderation up to, and including, full deletion.

    allison_h
    Hello Cason! Your board looks really great and I love the patterns of Jupiter in the redwood as well! The chess pieces also look so clean and uniform. Besides the appearance, were there any other differences between the red wood and cheaper wood? Is one easier to cut than the other?
    danielle_l
    Heya, Cason! Your pieces are looking excellent. I love the thought process behind turning the faulty queen into a king; that was super smart. The board looks wonderful so far to me after all that sanding; I love the choice of redwood for the blocks. Are you sure your redwood isn't just regular wood dyed by a popsicle? Ok, bad Zootopia joke aside, my real question is are there any challenges to using a disk sander as opposed to manual sanding? Can't wait to see the finished board soon!
    Dawn Ventura
    Cason, everything looks amazing! Do you expect any issues with the glue adding thickness to the blocks to affect the final fit in the frame?
    katherine_v
    Hello, Cason! I am really impressed at the progress you have made! Your board looks incredible, and I love the texture of the wood that you chose. Your pieces look great as well. Do you follow specific measurements to make each piece or do you just make it through instinct?
    nick_a
    Hi Cason! It's incredible to see how the board itself as well as the pieces are coming together. Sanding all the blocks must have been a grueling but rewarding process. Out of the chess pieces you made, was there any particular ones that were more difficult to shape or detail?
    meggiles
    I absolutely love seeing the progression here, Cason. You've accomplished so much! I am always on tenter hooks when I am witnessing a project that requires this level of work, and I am so thrilled to see how much is already complete. Well done, kid. MG
    cason_t
    Hello Allison! Redwood isn’t just denser—it truly shines in visual appeal and quality. Its minimal imperfections give it a premium feel compared to other woods. While redwood can be harder to cut, using table saws makes the difference negligible. Thank you for the comment!
    cason_t
    Hey Danielle, the thought of my board being made from dyed popsicle sticks is pretty funny! A disk sander really speeds up the process—just a second on it can save several minutes of normal sanding. While it’s true that it can sometimes take too much off, the benefits definitely outweigh the risks. Thanks again for your comment!
    cason_t
    Hello Ms. Ventura, thank you for your question! While the glue does slightly increase the thickness, the frame actually needs to be shortened anyway, so it shouldn’t pose much of a problem.
    cason_t
    Hi Kathy! When I make the pieces, I mostly rely on instinct, though I do refer to a reference piece when needed. This approach can result in slight variations between the pieces, but I think that’s what adds to the unique, handmade charm of the board. Thanks so much for the question!
    cason_t
    Hello Nick! I’d say the queen has been the toughest to shape so far, although the rooks have presented their own challenges as well. The difficulty mainly comes from their intricate details that need careful attention—for instance, the castle-like features of the rook and the crown on the queen. Thanks for asking about it!
    cason_t
    Hi Ms. Giles, thank you for the support!

Leave a Reply

Your email address will not be published. Required fields are marked *