Sixth Week: Joystick Nearing Completion
This week, I built the body of the joystick of my prototype accessible controller. Once I attach switches, the joystick will be complete. The design is very similar to my sketches from last week. The only difference is the type of screw. Instead of using a custom screw with a C-ring at the bottom, I found that an ordinary cap-head screw suffices. As shown in the picture below, it keeps all of the parts from falling off of the joystick, the spring fits between the head and the wood, and a washer spreads the spring’s force evenly.
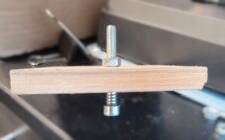
The ridges of metal threads are uncomfortable when they rub against skin, so next week I might add some plastic spacers between the wood and the top nut to cover them. An advantage of a cap-head screw is the threads are above the controller box, so I can attach a large tilt disk later on. Such a disk will make it easier to manipulate the joystick with my foot. I measured and marked a piece of Plexiglas to cut into disks. Once cut and fastened to the top of the screw, the joystick will be complete.
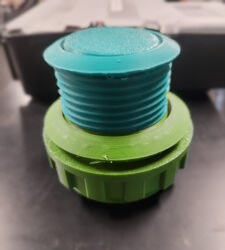
This week, I printed a third revision of the push-button. This version is 60 mm in diameter instead of the oversized 90 mm version I printed last week. This revision fits the internal actuator perfectly, however, I would like to make it a bit smaller. If the button is too large, it might require a user to move and stretch their toes uncomfortably far, which goes against the reason of why I wanted to make the buttons bigger. I think 40 mm will be a perfect compromise between the latest 60 mm version and the too-small 30 mm version I started with. 40 mm should be big enough to easily press with one’s toes without spreading the buttons far apart from each other. The image below shows the 60 mm button on top of the oversized 90 mm version from last week.
As I prepare the fourth revision of the push-button, I will add a channel or a rim on the inside to hold an auxiliary spring in place. Adding a spring will increase the resistance to depressing it, thus reducing miss-inputs and accelerating the button rebound. Similarly to how a key on a computer keyboard works, the faster a button firmly returns up, the easier it is to perform repeated button presses.
Finally, I revised my idea for the microswitch holder. Initially, I was going to recreate the plastic housing that held my old arcade controller’s joystick. That plastic housing included spots to hold microswitches. Upon closer inspection, I realized that nubs on the switch supports and joystick gates were the only surfaces keeping the microswitches in place. My redesign will consist of four separate 3D printed parts to hold the microswitches in place. I will use the gate to set the positions for the holder, and I will drill into the wood housing to set the holders into place. Doing so offers the flexibility to easily adjust the position of the microswitches, if it turns out my joystick is too long or too short for a standard gate. Alternatively, I can draft and 3D-print a custom gate when I finalize the microswitch positions.