Week 2: Dots and Diagrams
Platon B -
Welcome back Mustangs!
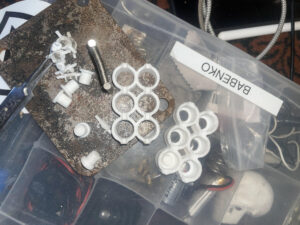
This week, I am happy to say that I’ve begun work on my first braille prototype. As a reminder, this week is focused on making an individual braille cell that functions properly. The first step in my process is designing the actual braille model with CAD software. Using some open-source software like AutoCad and Blender, I made a pretty basic yet functioning braille cell to experiment with. Next comes the actual manufacturing of the braille cell. For the magnets that push up each braille dot, I used some simple 2x3mm circular magnets I had lying around. For the braille cell itself, I decided to try 3D printing it.
3D printing is easier said than done. Many of the printed housings I made had physical deformities (from what I can only guess is overheating of the nozzle), so I spent multiple hours tweaking the settings and designing my braille cell to a more reliable model. Finally, I managed to print a full braille cell, albeit just the physical components. I expect to do the electronics side, such as the circuitry and copper wiring next week. What I found out with the final product was that 3D printing wasn’t nearly precise enough for making braille cells the size of a fingertip. Therefore, I plan to buy a resin printer soon, which can handle much better tolerances than the 3D printer.
Do any of you own a 3D printer or have heard about it? Let me know in the comments!
Below, I’ve attached an image of the braille cell with its component’s separated:
Comments:
All viewpoints are welcome but profane, threatening, disrespectful, or harassing comments will not be tolerated and are subject to moderation up to, and including, full deletion.